Let’s see how we can create Multibanco payment references and how to fetch payment notifications when using the Portuguese Payment gateway Easypay.
Make sure you’ve read the previous article, and take a look at this package that we’ll use as a wrapper for our API requests to Easypay.
You can always take a look at the official “documentation” and this repository that has all the working examples and complete code.
This article is organized in four parts:
- Payment flow and data schema
- Create a Multibanco payment reference
- Real time payment notifications
- Asynchronous payment notification
1. Payment flow and data schema
One of the difficulties I had when I needed to integrate Multibanco payment types from Portuguese Easypay payment gateway was how to “visualize” the data schema and how to store information on the database. So, I’ll also show a sample database schema based on the system I implemented.
This schema follows something along:
referencestable: Records all the “purchases”. This table will have one row per reference created (either for Multibanco or Direct Debit payment)paymentstable: Records all the attempts to charge the payment and stores the complete information regarding the payment when it’s been charged successfullypayment_notificationstable: Records all processed notifications associated with a given payment
You could merge references and payments, but I had a requirement that prevented me to use a single table. In the specific case a purchase may imply multiple payments - imagine this like a subscription for a service where you pay a monthly fee. In this case you have a single subscription (the reference) and multiple payments.
If you just want to implement the Multibanco payment type you can probably have a single table that keeps the reference and payment information.
The database schema, with the three tables, is available on GitHub.
The typical flow for a Multibanco payment is something like:
- Record the purchase in your application *
- Create the payment reference and display that information to your end user
- Wait until the end user pays that reference and mark the payment as successful
- Mark the purchase as completed *
Nr 1 and nr 4 are specific to your application, but you must have some code for that. Specifically the first step so you can then associate the purchase on your application with the payment on Easypay.
2. Create a Multibanco payment reference
In order to create a Multibanco reference you need to make a request to the 01BG API with the correct parameters. The mandatory parameters are as follows:
- ep_user: Identifies the user account on Easypay (should be your client’s user account).
It’s the same username you use to log into Easypay’s backoffice. - ep_entity: Entity associated with your client’s Easypay account.
It’s always a 5 digit number. - ep_cin: CIN (Client Identification Number) for the reference.
It’s a six digit number that will match the first six digits of the Multibanco reference (eg: 123 456 000). - t_value: Amount that you want to charge the user. You must use “.” (that is a dot) as the decimal separator.
- t_key: An identifier of your application regarding the purchase.
This allows you to cross-reference the purchase in your system with the payment on Easypay. Most of the times this is a autoincrement ID. - ep_language: Language used to display the gateway page. This field is filled with ‘PT’ by default by the package but you can change that to EN for example.
- ep_country: Filled by default by the package with PT but you need to make sure this value matches the country code of the CIN.
- ep_ref_type: For whatever reason this field is mandatory, but its value is always “auto”. It’s sent with default by the package
The s_code is also required if you’re using code authentication. If you’re authenticating your application with the code and not IP address you must always send this parameter on all API requests.
Optionally, you can also send the following parameters
- o_name: The end user’s name
- o_description: A payment description (for example, which service was subscribed or what product was bought)
- o_obs: Additional observation for the payment
- o_mobile: Phone or mobile phone number of the end user
- o_email: End user’s email
As long as you have this information you can simply create an instance of the package that serves as a wrapper, pass an array with the information or use the method setValue(key, value) to fill the parameters.
You can see the code below to create a Multibanco payment reference and you can find here the full working example.
use Easypay\EasyPay;

// The parameters `ep_language`, `ep_country` e `ep_ref_type` are set automatically by the package but you can pass them here if you need
$easypay = new EasyPay([
    'ep_user'   => 'YOUR_USER',
    'ep_entity' => '12345',
    'ep_cin'    => '123456',
    's_code'    => 'CODE_VALIDATION',
]);
// Specify the amount to charge the client
$easypay->setValue('t_value', '50.00');

// Set the key to cross-reference the purchase or subscription of your application with the payment request on Easypay
// Typically this will be generated by an autoincrement ID on the table you use to record the purchase or subscription
$easypay->setValue('t_key', 12);

// I'll also send the optional parameters
$easypay->setValue('o_name', 'John Doe');
$easypay->setValue('o_description', 'Purchase of amazing product');
$easypay->setValue('o_obs', 'Bought XPTO product on Nov 2017');
$easypay->setValue('o_mobile', '+351 123 456 789');
$easypay->setValue('o_email', 'email@example.com');

// At this point we just need to call the `createReference` method with the 'normal' parameter
// The `$result` will be an array with the response from the API
$result = $easypay->createReference('normal');
The request response always returns a XML with a ep_status that shows if the request was successful or not and a ep_message with a description of the status. In case an error occurs, the XML will be something like:
<?xml version="1.0" encoding="ISO-8859-1"?>
<getautoMB>
    <ep_status>err1</ep_status>
    <ep_message>ep_country or ep_entity or ep_user or ep_cin not ok;</ep_message>
    <ep_cin>123456</ep_cin>
    <ep_user>YOUR_USER</ep_user>
    <ep_entity>00</ep_entity>
    <ep_reference>00</ep_reference>
    <ep_value>00</ep_value>
    <ep_key>00</ep_key>
    <ep_link></ep_link>
</getautoMB>
Beware that “err1” on ep_status is not a typo. This is actually the value returned by the API when an error occurs.
When the payment reference is created, then the response XML will be similar to:
<?xml version="1.0" encoding="ISO-8859-1"?>
<getautoMB>
    <ep_status>ok0</ep_status>
    <ep_message>ep_country and ep_entity and ep_user and ep_cin ok and validation by code;code ok - new reference generated - 123456789 - </ep_message>
    <ep_cin>123456</ep_cin>
    <ep_user>YOUR_USER</ep_user>
    <ep_entity>12345</ep_entity>
    <ep_reference>123456789</ep_reference>
    <ep_value>50.00</ep_value>
    <t_key>12</t_key>
    <ep_link>http://test.easypay.pt/_s/c11.php?e=12345&r=123456789&v=50.00&c=PT&l=PT&t_key=12</ep_link>
</getautoMB>
At this point you have access to all the information necessary for your end user to pay the reference. The end user will only need ep_entity, ep_reference e ep_value. You should store this information on the database, display the information to the end user and, if needed, send an email with the payment information.
Now, a few notes on Easypay’s backoffice:
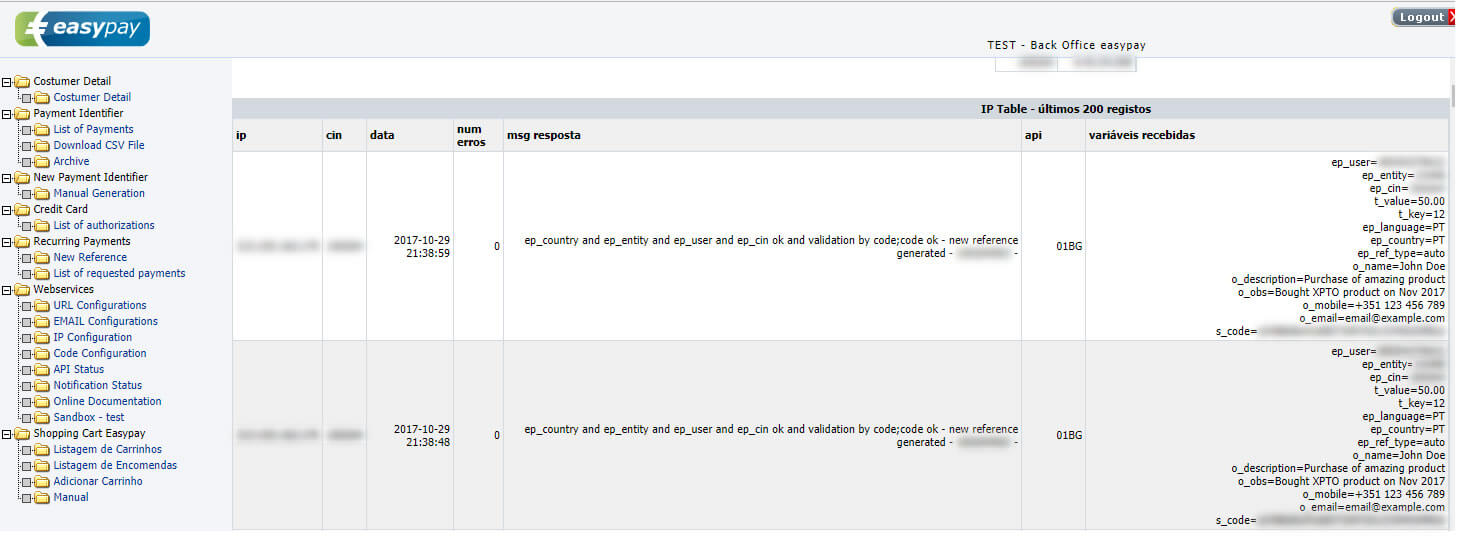
You can view all the API requests on their backoffice using the menu Webservices » API Status
Whenever a new payment reference is created, you can access that information through the backoffice on New Payment Identifier » Manual Generation
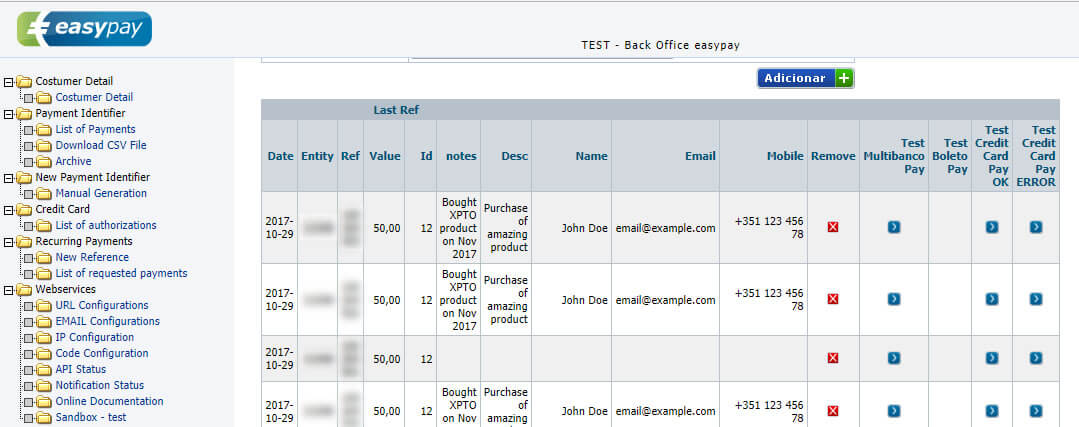
When you’re in a development environment, in order to test the payment notifications, you can use the column Test Multibanco Pay that is displayed on the above image. When you click that button, Easypay will simulate the payment of that reference. This is, obviously, to avoid you pay for anything when developing.
After the payment reference is payed there are two ways you can get that information. You can use only one or the two at the same time, but this depends on how you want to implement your system. The following steps describe how you can get notified that the reference was payed.
3. Real time payment notifications
This method allows your application to have immediate knowledge of when the payment is performed by the end user. The “official” documentation states that you can use this method for Multibanco, Bank transfer and Credit Card payments, but I can only assure this works with Multibanco payments (haven’t tested the other payment types).
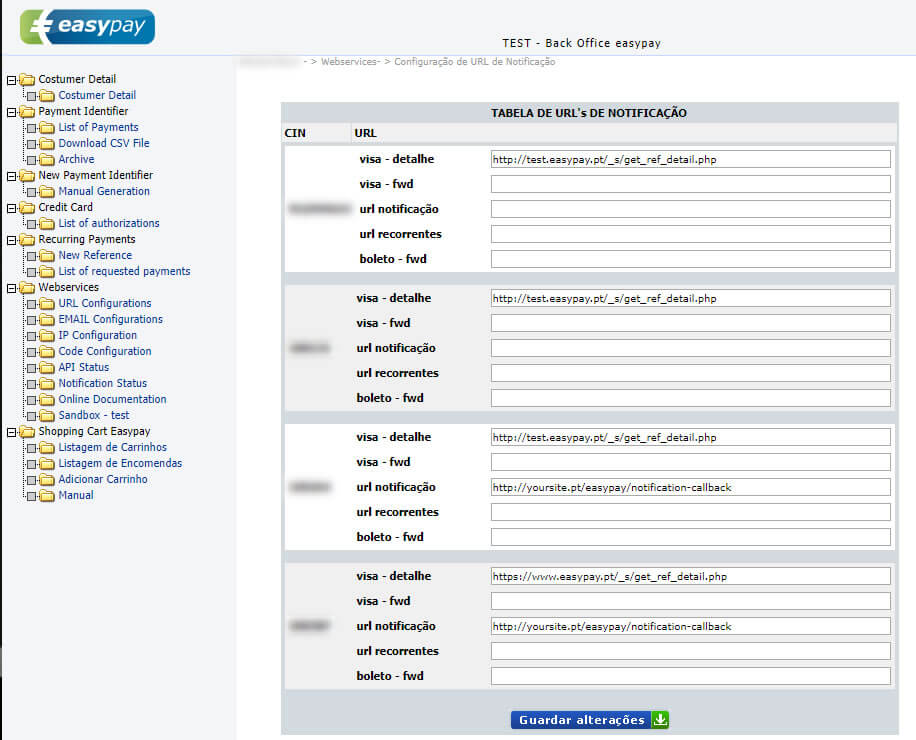
In order for your application to be notified in real time, you need to go to Easypay’s backoffice and configure the URL to be called when a payment is placed. You can do so by going through the menu Webservices » URL Configuration and fill in the fieldurl notificação of the CIN you’re using.
You should specify a URL for your site / application that can receive and process the notification sent by Easypay. Whenever Easypay confirms the payment by the bank it will make a request to that URL with a few parameters. The request will be a GET request with the parameters ep_cin, ep_user e ep_doc. The call will be something like:
http://www.yoursite.com/your/notification_url.php?ep_cin=123456&ep_user=YOUR_USER&ep_doc=MBTEST0001234567890123456789
So, you get access to an ep_doc variable as the identifier of the payment, but you don’t have access to this value as it’s not returned when you create the reference. The only way we have, right now, to identify the payment and cross-reference it with our purchase or subscription is through ep_reference or t_key. To solve this you need to make yet another API request to 03AG API, that returns all the complete information about a payment, including the fields we already have.
When you call this API you must return a proper XML to Easypay as is indicated in the documentation, which contains a ep_key parameter that must identify the payment from your side (not to be confused with t_key which identifies the purchase or subscription). If you don’t have this value in your database, you’ll need to create it during the notification process.
In short, the notification process will include the following steps:
- Call 03AG API to get the complete information regarding the payment
- Create a ep_key on your application / database
- Return a proper XML in response to Easypay’s request
There may be other steps involved specific to your application, for instance, you may need to store the payment information on the database or send someone an email.
In a while I’ll show you the code, but if you want it right now you can find it in the repository. For now, it’s important to understand what is the XML sent by Easypay’s request to your endpoint.
<?xml version="1.0" encoding="ISO-8859-1"?>
<getautoMB_detail>
    <ep_status>ok0</ep_status>
    <ep_message>ep_country and ep_entity and ep_user and ep_cin ok and validation by code;code ok - doc MBTEST0001234567890123456789 and key  ok;</ep_message>
    <ep_cin>123456</ep_cin>
    <ep_user>YOUR_USER</ep_user>
    <ep_key></ep_key>
    <t_key>12</t_key>
    <ep_doc>MBTEST0001234567890123456789</ep_doc>
    <ep_payment_type>MB</ep_payment_type>
    <ep_entity>12345</ep_entity>
    <ep_reference>123456789</ep_reference>
    <ep_value>50</ep_value>
    <ep_value_fixed>0.35</ep_value_fixed>
    <ep_value_var>0.9</ep_value_var>
    <ep_value_tax>0.2625</ep_value_tax>
    <ep_value_transf>48.4875</ep_value_transf>
    <ep_date_transf>2017-11-03</ep_date_transf>
    <ep_date_read>2017-10-31 19:49:30</ep_date_read>
    <ep_status_read>verified</ep_status_read>
    <o_key>12</o_key>
    <o_obs><![CDATA[Purchase of amazing product]]></o_obs>
    <o_email>email@example.com</o_email>
    <o_mobile>+351 123 456 78</o_mobile>
    <ep_date>2017-10-31 19:10:24</ep_date>
</getautoMB_detail>
A quick note to the ep_payment_type that you can use to identify the payment type. When the value is “MB” you know the payment was placed through Multibanco.
At this moment, when you have the full payment information, you need to create the ep_key, which should be an auto increment number that will identify the payment on your application’s side and needs to be sent back to Easypay. Usually this number will be auto generated when you insert the payment information on a database and get the auto increment id of the row that was inserted.
When you have the ep_key you can create the response XML for the Easypay request, that needs the following information:
<!--?xml version="1.0" encoding="ISO-8859-1"?-->
<getautomb_key>
    <ep_status>ok0</ep_status>
    <ep_message>generated document</ep_message>
    <ep_cin>123456</ep_cin>
    <ep_user>YOUR_USER</ep_user>
    <ep_doc>MBTEST0001234567890123456789</ep_doc>
    <ep_key>3</ep_key>
</getautomb_key>
Below you can see the strictly necessary code but you can get the full example and working code in this repository.
// We'll start by preparing the XML, with all the information we already have,
// that we need to return at the end

$epCin = $_GET['ep_cin'];
$epUser = $_GET['ep_user'];
$epDoc = $_GET['ep_doc'];

$xml = new SimpleXMLElement('<getautoMB_key></getautoMB_key>');
$xml->addChild('ep_cin', $epCin);
$xml->addChild('ep_user', $epUser);
$xml->addChild('ep_doc', $epDoc);

// Now we need to call Easypay's API to get the full payment information
// This is marked as step 4 in the official documentation
$easypay = new Easypay\EasyPay([
    'ep_user'   => 'YOUR_USER',
    'ep_entity' => '12345',
    'ep_cin'    => '123456',
    's_code'    => 'CODE_VALIDATION',
]);
// Call API 03AG
$paymentInfo = $easypay->getPaymentInfo([
    'ep_cin'  => $epCin,
    'ep_user' => $epUser,
    'ep_doc'  => $epDoc,
]);

// You'll have to have code to deal with errors and exceptions - see the full code

// Lets set up a database connection so we can store the information and get the ep_key value
$conn = new PDO(
    'mysql:host=localhost;dbname=easypay_examples',
    'db_user',
    'db_pass'
);
$conn->setAttribute(PDO::ATTR_ERRMODE, PDO::ERRMODE_EXCEPTION);

// I assume the reference was stored in the easypay_references table
// when it was created (step 1 of this article)
$stmt = $conn->prepare('SELECT * FROM easypay_references WHERE ep_reference = :ep_reference');
$stmt->execute([':ep_reference' => $paymentInfo['ep_reference']]);
$easypayReference = $stmt->fetch();

// Once you get the row from easypay_reference, we can insert a new row on easypay_payments.
$stmt = $conn->prepare("
    INSERT INTO easypay_payments (easypay_reference_id, ep_doc, ep_cin, ep_user, ep_status, ep_message,
        ep_entity, ep_reference, ep_value, ep_date, ep_payment_type, ep_value_fixed, ep_value_var,
        ep_value_tax, ep_value_transf, ep_date_transf, t_key)
    VALUES (:easypay_reference_id, :ep_doc, :ep_cin, :ep_user, :ep_status, :ep_message, :ep_entity,
        :ep_reference, :ep_value, :ep_date, :ep_payment_type, :ep_value_fixed, :ep_value_var,
        :ep_value_tax, :ep_value_transf, :ep_date_transf, :t_key)
");
$stmt->execute([
    ':easypay_reference_id' => $easypayReference['id'],
    ':ep_doc' => $epDoc,
    ':ep_cin' => $epCin,
    ':ep_user' => $epUser,
    ':ep_status' => $paymentInfo['ep_status'],
    ':ep_message' => $paymentInfo['ep_message'],
    ':ep_entity' => $paymentInfo['ep_entity'],
    ':ep_reference' => $paymentInfo['ep_reference'],
    ':ep_value' => $paymentInfo['ep_value'],
    ':ep_date' => $paymentInfo['ep_date'],
    ':ep_payment_type' => $paymentInfo['ep_payment_type'],
    ':ep_value_fixed' => $paymentInfo['ep_value_fixed'],
    ':ep_value_var' => $paymentInfo['ep_value_var'],
    ':ep_value_tax' => $paymentInfo['ep_value_tax'],
    ':ep_value_transf' => $paymentInfo['ep_value_transf'],
    ':ep_date_transf' => $paymentInfo['ep_date_transf'],
    ':t_key' => $paymentInfo['t_key'],
]);
// Now we have access to the ep_key which is the value of our auto increment column.
// Lets fetch it
$epKey = $conn->lastInsertId();

// Add the ep_key parameter to the XML
$xml->addChild('ep_key', $epKey);

// Add the status and message to the XML
$xml->addChild('ep_status', 'ok0');
$xml->addChild('ep_message', 'generated document');

// Print the XML so Easypay can read our response
header("content-type: text/xml; charset=utf-8");
echo $xml->saveXML();
4. Asynchronous payment notification
If you don’t mind having async notifications you don’t need to implement real time notifications and can implement the 040BG1 API that returns information regarding a set of payments based on a given period of time.
This API expects the parameters ep_cin, ep_user and ep_entity. Optionally, you need to send the parameters_code as we’ve discussed before regarding the authentication. When you request this API with the minimum parameters you’ll get the 10 latest paid payments.
In order to test Easypay’s 040GB1 API you can make a request directly from the browser of through Postman. The URL you should will be something like follows:
http://test.easypay.pt/_s/api_easypay_040BG1.php?ep_user=YOUR_USER&s_code=VALIDATION_CODE&ep_cin=123456&ep_entity=12345
If you want a more detailed list of payments and not just the latest 10 payments, you must also send the parameters o_list_type, o_ini and o_last, where the values of these last two parameters are filled based on what you set on o_list_type.
For instance, if you want the latest 100 paid payments you should set the value “last” on the parameter o_list_type and set the parameter _oini with the number of payments you want to fetch (in this case, 100).
http://test.easypay.pt/_s/api_easypay_040BG1.php?ep_user=YOUR_USER&s_code=VALIDATION_CODE&ep_cin=123456&ep_entity=12345&o_list_type=last&o_ini=100
In turn, if you want to fetch payments based on a set of dates you must specify “date” on o_list_type o valor “date” and specify the dates on the parameters o_ini and o_last:
http://test.easypay.pt/_s/api_easypay_040BG1.php?ep_user=YOUR_USER&s_code=VALIDATION_CODE&ep_cin=123456&ep_entity=12345&o_list_type=date&o_ini=2017-11-01&o_last=2017-11-01
As opposed to the Real time notification method, this API returns the complete payment information and you don’t need to have an additional request to 03AG API.
The response from 040BG1 API is a XML similar to:
<?xml version="1.0"?>
<get_ref>
    <ep_status>ok0</ep_status>
    <ep_message>ep_country and ep_entity and ep_user and ep_cin ok and validation by code;code ok - query with 2 records</ep_message>
    <ep_num_records>2</ep_num_records>
    <ref_detail>
        <ref>
            <ep_cin>123456</ep_cin>
            <ep_user>YOUR_USER</ep_user>
            <ep_entity>12345</ep_entity>
            <ep_reference>123456789</ep_reference>
            <ep_value>50</ep_value>
            <ep_key>51</ep_key>
            <t_key>7</t_key>
            <ep_doc>MBTEST1234567891234567891234</ep_doc>
            <ep_payment_type>MB</ep_payment_type>
            <ep_value_fixed>0.35</ep_value_fixed>
            <ep_value_var>0.9</ep_value_var>
            <ep_value_tax>0.2625</ep_value_tax>
            <ep_value_transf>48.4875</ep_value_transf>
            <ep_date_transf>2017-11-04</ep_date_transf>
            <ep_key_read>51</ep_key_read>
            <ep_date_read>2017-11-01 12:00:00</ep_date_read>
            <ep_status_read>verified</ep_status_read>
            <ep_status>pago</ep_status>
            <ep_batch_transf></ep_batch_transf>
            <ep_invoice_number></ep_invoice_number>
            <ep_payment_date>2017-11-01 12:00:00</ep_payment_date>
        </ref>
        <ref>
            <ep_cin>123456</ep_cin>
            <ep_user>YOUR_USER</ep_user>
            <ep_entity>12345</ep_entity>
            <ep_reference>123456788</ep_reference>
            <ep_value>50</ep_value>
            <ep_key>50</ep_key>
            <t_key>12</t_key>
            <ep_doc>MBTEST9632587410012354698714</ep_doc>
            <ep_payment_type>MB</ep_payment_type>
            <ep_value_fixed>0.35</ep_value_fixed>
            <ep_value_var>0.9</ep_value_var>
            <ep_value_tax>0.2625</ep_value_tax>
            <ep_value_transf>48.4875</ep_value_transf>
            <ep_date_transf>2017-11-03</ep_date_transf>
            <ep_key_read>50</ep_key_read>
            <ep_date_read>2017-11-01 15:30:00</ep_date_read>
            <ep_status_read>verified</ep_status_read>
            <ep_status>pago</ep_status>
            <ep_batch_transf></ep_batch_transf>
            <ep_invoice_number></ep_invoice_number>
            <ep_payment_date>2017-10-31 18:15:30</ep_payment_date>
        </ref>
    </ref_detail>
</get_ref>
When using the async notification method you should have some kind of cronjob or scheduled task that is executed from time to time and makes a request to this API. When the API returns payments you should look for a payment identifier (for instance, the ep_reference) and update the information on your application’s database.
Based on the parameters and the values you specify in the request you can get the same payment multiple times, so it’s useful to have some fallback code to avoid processing the same payment over and over. Another difference from this method to the real time method is that you don’t need to send a XML response to Easypay.
A quirk of this awesomely named endpoint is that when there are no results (no payments) the endpoint returns a ep_status with the value “err1” as shown below. Now that’s something amazing, I know! So, you need to make sure you add code to verify what’s an actual error and what’s a “zero results” error.
<?xml version="1.0" encoding="ISO-8859-1"?>
<get_ref>
    <ep_status>err1</ep_status>
    <ep_message>ep_country and ep_entity and ep_user and ep_cin ok and validation by code;code ok - query with no records</ep_message>
</get_ref>
The fully functional example is in the repository and you can see the relevant code below.
$easypay = new Easypay\EasyPay([
    'ep_user'   => 'YOUR_USER',
    'ep_entity' => '12345',
    'ep_cin'    => '123456',
    's_code'    => 'CODE_VALIDATION',
]);

// Call the endpoint with the parameters we want
// In this case, let's fetch the payments for a single day
$payments = $easypay->fetchAllPayments([
    'o_list_type' => 'date',
    'o_ini'       => '2017-11-04',
    'o_last'      => '2017-11-04',
], true);

// Deal with the "zero results" "error" ...
if ($payments['ep_status'] === 'err1'
    && strpos($payments['ep_message'], ' - query with no records') !== false
    ) {
    var_dump($easypay->getLogs());
    // There are no payments for the request
    echo 'no results';
    die();
}

// Deal with actual errors
if ($payments['ep_status'] === 'err1') {
    var_dump($paymentInfo);
    throw new Exception('Something went wrong fetching payments');
}

foreach ($payments['ref_detail'] as $payment) {
    // In this case we just want to process MB payment types
    if ($payment['ep_payment_type'] !== 'MB') {
        continue;
    }

    // Let's look for the reference that originated this payment
    $stmt = $conn->prepare('SELECT * FROM easypay_references WHERE ep_reference = :ep_reference');
    $stmt->execute([':ep_reference' => $payment['ep_reference']]);
    $easypayReference = $stmt->fetch();

    // If we can't find the reference, let's move along.
    // IMPORTANT: the client can make a mistake and pay your application's
    // reference by mistake - this has happened before
    if (!is_array($easypayReference) || empty($easypayReference)) {
        continue;
    }

    // So we know what the reference is and it was processed by our application
    // let's create the record on easypay_payments table.
    $stmt = $conn->prepare("
        INSERT INTO easypay_payments (easypay_reference_id, ep_doc, ep_cin, ep_user, ep_status, ep_message,
            ep_entity, ep_reference, ep_value, ep_date, ep_payment_type, ep_value_fixed,
            ep_value_var, ep_value_tax, ep_value_transf, ep_date_transf, t_key)
        VALUES (:easypay_reference_id, :ep_doc, :ep_cin, :ep_user, :ep_status, :ep_message,
            :ep_entity, :ep_reference, :ep_value, :ep_date, :ep_payment_type, :ep_value_fixed,
            :ep_value_var, :ep_value_tax, :ep_value_transf, :ep_date_transf, :t_key)
    ");
    $stmt->execute([
        ':easypay_reference_id' => $easypayReference['id'],
        ':ep_doc' => $payment['ep_doc'],
        ':ep_cin' => $payment['ep_cin'],
        ':ep_user' => $payment['ep_user'],
        ':ep_status' => $payment['ep_status'],
        ':ep_message' => $payment['ep_message'],
        ':ep_entity' => $payment['ep_entity'],
        ':ep_reference' => $payment['ep_reference'],
        ':ep_value' => $payment['ep_value'],
        ':ep_date' => $payment['ep_date'],
        ':ep_payment_type' => $payment['ep_payment_type'],
        ':ep_value_fixed' => $payment['ep_value_fixed'],
        ':ep_value_var' => $payment['ep_value_var'],
        ':ep_value_tax' => $payment['ep_value_tax'],
        ':ep_value_transf' => $payment['ep_value_transf'],
        ':ep_date_transf' => $payment['ep_date_transf'],
        ':t_key' => $payment['t_key'],
    ]);
}
And this is it. In the next article I’ll talk about Direct Debit where the flow is a bit more complex.
This article is part of the series “How to integrate with Easypay.pt Payment Gateway”
Article image from Freepik: Background vector created by Photoroyalty - Freepik.com