One of the most neglected processes in Software Development is the ability to know how exactly is your project’s health. To do so you need a complex and periodic analysis to ensure your project’s maintenance is sustainable. There are several tools that help you to perform such analysis and among them is SonarQube.
In this article, which is part of the series “How to create a continuous integration server” and began with the article Tools for a Continuous Integration (CI) server, I’ll show you how to install and configure SonarQube and SonarQube Runner.
But first it’s important to describe and understand what is SonarQube. The open-source project started with the name Sonar, which changed to SonarQube around 2013 due to a trademark issue. Since it’s open-source the project is available on GitHub to anyone who wants to contribute or to analyse the code.
The project defines itself as a continuous inspection to the code quality where one of the top features is the measurement of Technical Debt. Technical debt specifies the ammount of time (minutes, hours, days) needed to improve your project’s code according to the standards in use. To know more about technical debt check this Wikipedia’s article.
Even though our main purpose is to analyse a PHP and Javascript project, SonarQube supports more than 20 programming languages, including Java, C/C++ or C#, and is also available for Android projects. To check all specifications go to the official feature’s page or read a brief description on this Wikipedia’s article.
Without further ado let’s install SonarQube and SonarQube Runner.
1. Install SonarQube
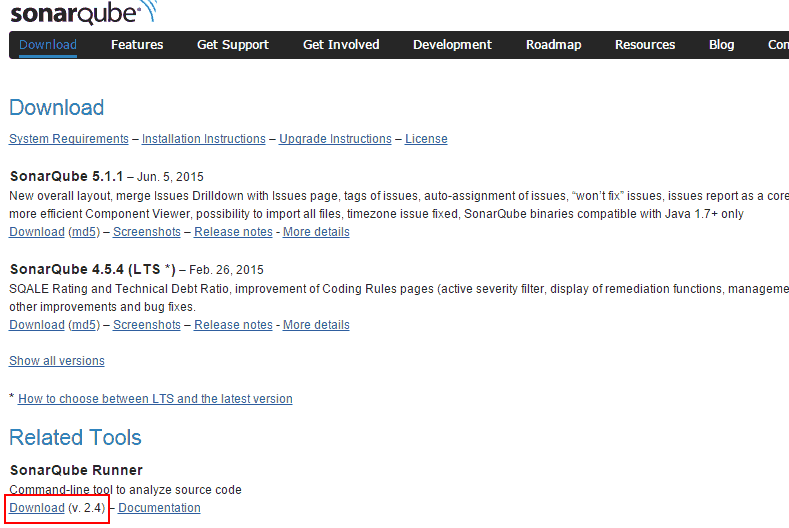
Go to the download page and download the latest version. At the time of writing the latest version is 5.1.1 and that’s the one I’ll install (although 4.5.4 is also available due to LTS).
When the download is completed, go to your Downloads directory, extract the file and move it to your intended destination (I’ll use
/opt/to be consistent across all articles).cd ~/Downloads unzip sonarqube-5.1.1.zip sudo mv sonarqube-5.1.1 /opt/Create a new database to store SonarQube’s analysis. In this series of articles we’ve already installed and used MySQL (when we installed Redmine and when we installed Teamcity) so I’ll stick with it for SonarQube. Name your database sonar and create a sonarqubeusr user with the password SonarQube@usr.
The default database name is sonar. I strongly advice you to use that name if you can since you can experience some difficulties if you change it to something else.mysql –uroot –p create database sonar character set utf8; create user 'sonarqubeusr'@'localhost' identified by 'SonarQube@usr'; GRANT ALL PRIVILEGES ON sonar.* TO 'sonarqubeusr'@'localhost'; exitChange SonarQube’s configurations according to the created database.
sudo gedit /opt/sonarqube-5.1.1/conf/sonar.propertiesGo through the file, remove the comments (#) and change the values of the variables according to the following:
sonar.jdbc.username=sonarqubeusr
sonar.jdbc.password=SonarQube@usr
sonar.jdbc.url=jdbc:mysql://localhost:3306/sonar?useUnicode=true&characterEncoding=utf8&rewriteBatchedStatements=true&useConfigs=maxPerformance
If you want to change the default URL or the port change the variables
sonar.web.hostandsonar.web.portto whatever you need. I’ll keep the defaults for this article, so I’ll access the application through http://localhost:9000You’ll need to start SonarQube with the following command.
/opt/sonarqube-5.1.1/bin/linux-x86-64/sonar.sh startNote the path takes into account the current operating system's information, so you need to change `linux-x86-32` to the correct version of your operating system.At this time you’ll, when you access SonarQube, you’ll see a web page similar to:

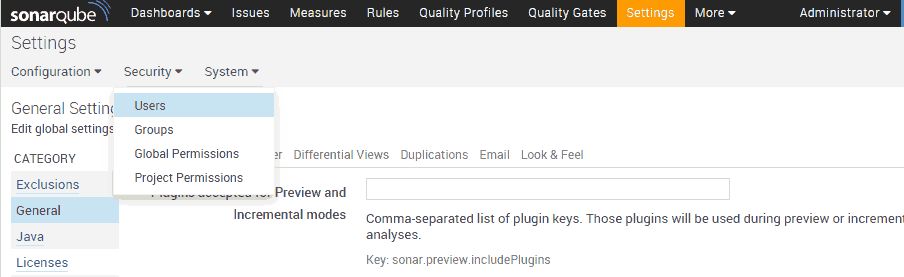
A default admin account is created with the password admin which you can use to login. To create or change users, login on SonarQube and go to Settings » Security » Users.
2. Install SonarQube Runner
SonarQube displays information about the analysis and project’s quality. However the analysis isn’t performed by SonarQube. In this article I’ll use SonarQube Runner, which is the recommended tool to perform the analysis. There other alternatives such as Ant or Maven. You can look for the alternative specifics and a global view about the analysis in this documentation page.
To put it simply, SonarQube Runner’s responsibility is to go through all your application source code and analyse if the source code matches the standards in use for your project. But I’m getting ahead of myself. For now we’ll install SonarQube so it’s available for the next article.
To install SonarQube Runner execute the following steps:
Go to the download page and download SonarQube Runner.
On your Downloads directory, extract the downloaded file and move it to your intended destination (once again, I’ll use
/opt/).cd ~/Downloads unzip sonar-runner-dist-2.4.zip sudo mv sonar-runner-2.4/ /opt/Open SonarQube Runner’s configuration file in order to use the correct definitions.
sudo gedit /opt/sonar-runner-2.4/conf/sonar-runner.propertiesOn the configuration file uncomment and set the correct values in the properties
sonar.host.url,sonar.jdbc.url(MySQL),sonar.jdbc.username,sonar.jdbc.passwordesonar.sourceEncoding. If you’re using version 2.4 your should have a configuration file similar to:#Configure here general information about the environment, such as SonarQube DB details for example #No information about specific project should appear here #----- Default SonarQube server sonar.host.url=http://localhost:9000 #----- PostgreSQL #sonar.jdbc.url=jdbc:postgresql://localhost/sonar #----- MySQL sonar.jdbc.url=jdbc:mysql://localhost:3306/sonar?useUnicode=true&characterEncoding=utf8 #----- Oracle #sonar.jdbc.url=jdbc:oracle:thin:@localhost/XE #----- Microsoft SQLServer #sonar.jdbc.url=jdbc:jtds:sqlserver://localhost/sonar;SelectMethod=Cursor #----- Global database settings sonar.jdbc.username=sonarqubeusr sonar.jdbc.password=SonarQube@usr #----- Default source code encoding sonar.sourceEncoding=UTF-8 #----- Security (when 'sonar.forceAuthentication' is set to 'true') #sonar.login=admin #sonar.password=admin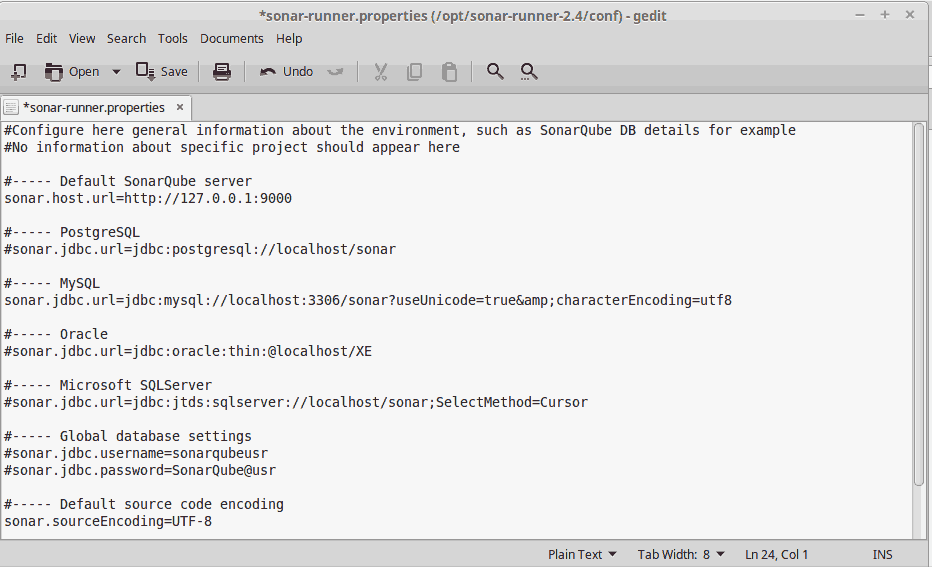
And that’s it, you have installed both SonarQube and SonarQube Runner. In the following article I’ll show you how to install the necessary dependencies (PHPUnit), how to properly configure a Laravel 5 project and we’ll perform the SonarQube analysis based on the most common standards.
This article is a part of the series How to set up a Continuous Integration Server for PHP projects
- Tools for a Continuous Integration (CI) server for PHP projects
- Install SSH and Git on Linux and configure a Windows development machine
- Install Redmine and integrate it with Git
- Install and configure TeamCity 9
- Install and configure TeamCity Agent on Linux Mint
- Install SonarQube and SonarQube Runner on Linux Mint - You are here
- Analyse a Laravel 5 (PHP) project with SonarQube
- Integrate SonarQube with TeamCity and Redmine