In the second article of the series “How to set up a continuous integration server” we’ll install Git and SSH on a server running Linux Mint.
We’ll show you how to configure this services on a Windows machine so, in the end, you push your code from a Windows development machine to the Linux server.
This article is divided in the following sections:
- Install and set up a bare Git repository on Linux
- Install SSH and generate the RSA keys on Linux
- Install and configure Git and SSH on Windows
- Create a PHP project and push it to the server
1. Install and set up a bare Git repository on Linux
Let’s begin by installing Git by running the command
sudo apt-get install gitNow we’ll create the bare repository on the directory /home/user/git. Feel free to create the repository in another location if you prefer. With the commands below, we’ll create a directory and initialize the repository.
mkdir /home/user/git
mkdir /home/user/git/testproject.git/
cd /home/user/git/testproject.git/
sudo chown -R user /home/user/git/testproject.git
sudo git --bare init
Note that “user” is the username on the server and you should change this value to your username. The command
chownchanges the owner of the directory to make sure your user has permissions to read and write on the files within the directory.And we’re almost done here. Even though it’s not likely nor common to make changes to the bare repository, it’s better if you configure the username and email for Git.
git config --global user.name "user"
git config --global user.email geeks@geekalicious.pt
And our bare repository is created
2. Install SSH and generate the RSA keys on Linux
The main purpose of this series is to develop the PHP project on a Windows machine and push those changes to the continuous integration server. To do so, we need to create a connection to Git through one of the available Git protocols. The most common used protocol is SSH and that’s what we’ll install.
Let’s install SSH with
sudo apt-get install openssh-serverSSH need a pair of RSA keys, that you can generate with
ssh-keygen -t rsaThis command will ask you for the location and name of the key. I choose to leave the value by default (_/home/user/.ssh/idrsa). As to the passphrase, enter one of your choise.
Now let’s make sure the service is running
ps -e | grep [s]sh-agentIf it’s running, you should see something like the following
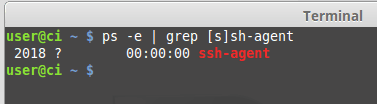
Otherwise, you have to start the service by
ssh-agent /bin/bashWe need to add the RSA identity to the authentication agent with the command
ssh-add ~/.ssh/id_rsaAnd let’s make sure the RSA identity was successfully added with
ssh-add -lIf everything was correct, you should see a message like the following

Add the machine user to SSH configuration
sudo gedit /etc/ssh/sshd_configThe command will show you a editor where you need to add the following line. Note that user is the my machine’s username and you should change this to your username
AllowUsers userAfter the file is saved and closed, you need to restart the SSH service
sudo /etc/init.d/ssh restartNow that we have installed SSH, let’s test the connection from a Windows machine. To do so, we will use PuTTY that you should download. It’s better if you install PuTTY instead of downloading multiple files, since we’ll need
putty.exe,puttygen.exe,pageant.exeandplink.exe.I also advice you to install PuTTY to a path without spaces (ex: c:\programs\putty) to avoid unnecessary issues.
After you’ve installed PuTTY, execute
putty.exeand enter the IP address or server name
Since you’re connection through SSH for the first time, you’ll see a message to cache the RSA key. Click on yes.
So we made sure that SSH is working. However, when you’re developing, you don’t want to keep entering your username and password for each Git push.
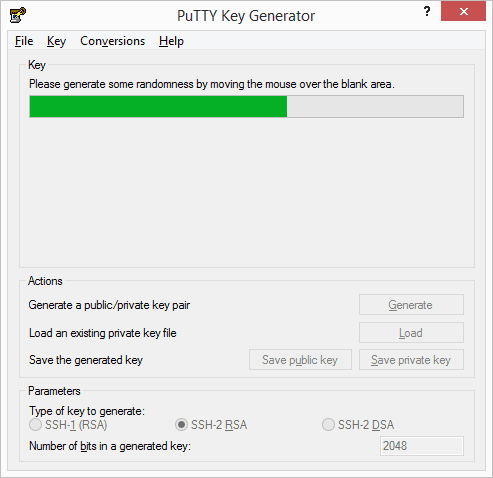
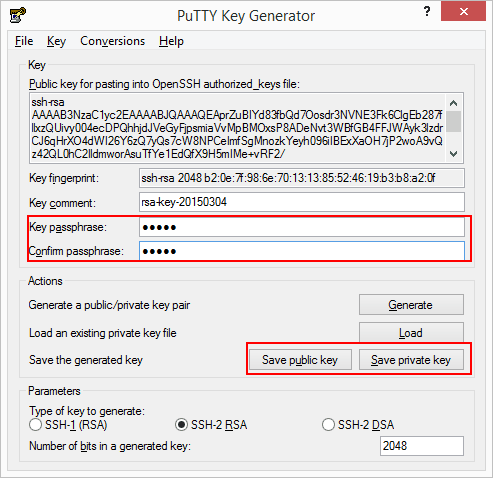
The solution to this is to create a RSA key pair to make authentication “automatic”. Let’s use PuTTYgen to generate the keys
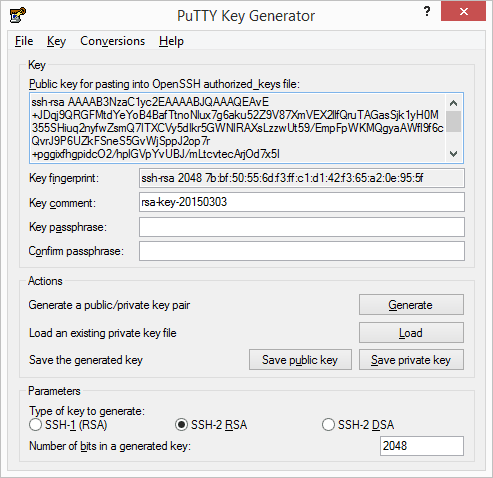
Let’s go back to the server and access the directory .ssh within our user’s home directory. We need to append the generated key to the file _authorizedkeys and we can do that with the following commands
cd ~/.ssh/
echo «puttygen-generated-key» >> authorized_keys
In order to use the generated keys, we need to save them. Fill the Key passphrase and Confirm passphrase and click on Save private key. Make sure you also save the public key since the authentication only works with the pair.
On Windows (Vista, 7 e 8), save the private key to _c:\users\«user».ssh\idrsa where «user» is your Windows username.
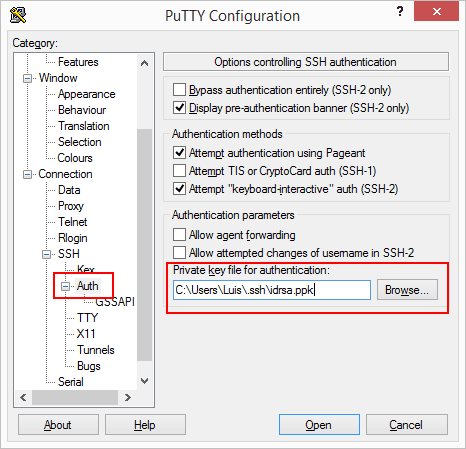
Let’s connect to the server with SSH again but this time we’ll use the generated keys for the authentication. To do so, we need to change the settings of our PuTTY session. Open PuTTY and access to Connection » SSH » Auth. and set the key _idrsa to the option Private key file for authentication.
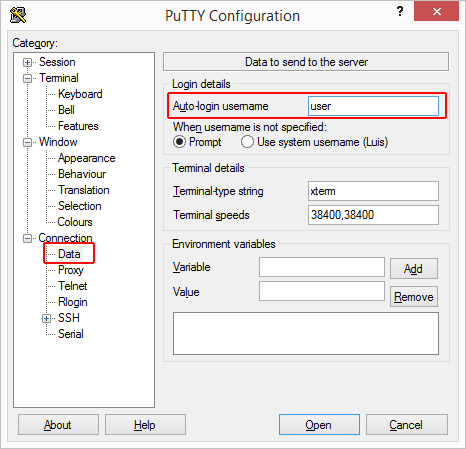
Let’s also set the auto-login name to avoid the need to specify the username each time we start a session. Go to Connection » Data and enter your server’s username on Auto-login username
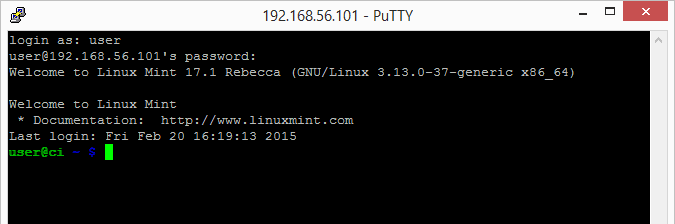
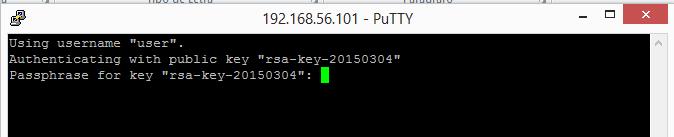
If you did everything correctly, when you start you SSH session with PuTTY, you’ll see something like
At this time we need to change the permissions of _authorizedkeys on the server, so the file is read-only by its owner.
chmod 400 authorized_keysNow you can perform SSH connection with the RSA keys or with the pair username / password. You can change the SSH configuration to accept only connections with the keys. If you want to do so, run the following commando
sudo gedit /etc/ssh/sshd_configIn the open editor, change the settings to match the following options
PasswordAuthentication no
UsePAM no
3. Install and configure Git and SSH on Windows
In the previous section we started the SSH configuration on Windows with the installation of PuTTY and generate the RSA keys. We’re missing Git and a few configurations that we’ll set up in the following steps.
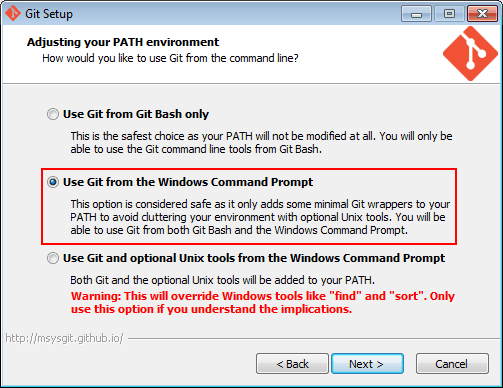
Start by downloading Git. When installing make sure you select the option “Use Git from the Windows Command Prompt”
Upon installation, go to Windows Environment Variables and create a new variable called
GIT_SSHwith the full path forplink.exe(included when you installed PuTTY).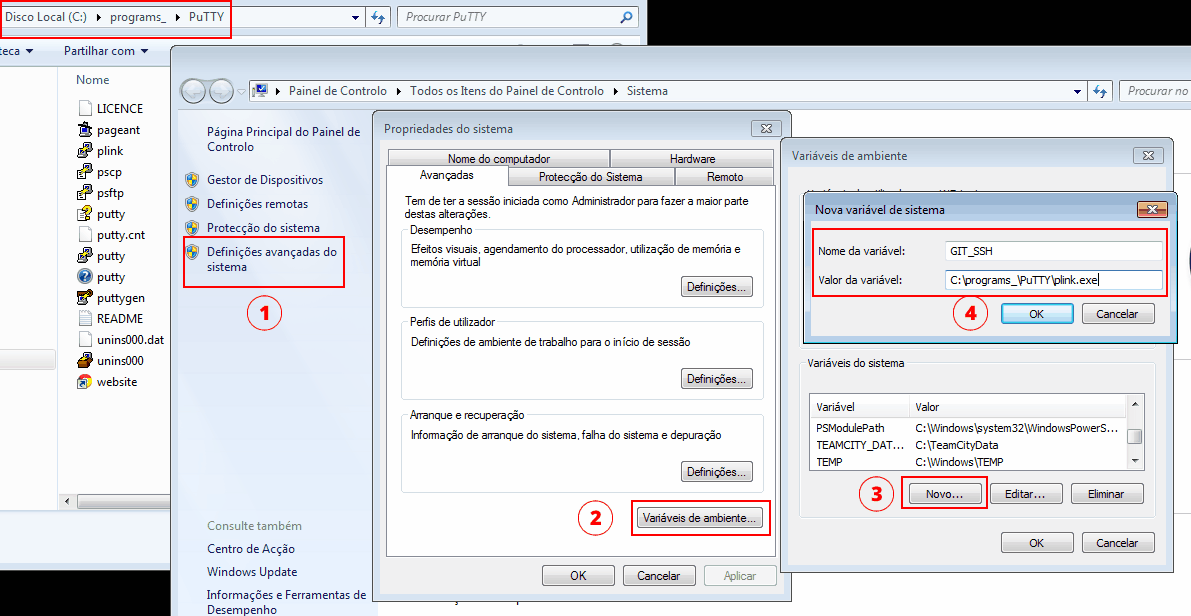
While you’re here, add the paths to the folder
bininside the installation folder Git and the path to the installation folder of PuTTY to the environment variablePATH. You’ll append something like:;C:\programs_\PuTTY\;C:\programs_\git\bin\.Important: If you have a Firewall or a All in One security solution, make sure all Git files are “Trusted”. If you fail to do so you will, most likely, end up with a few errors such as
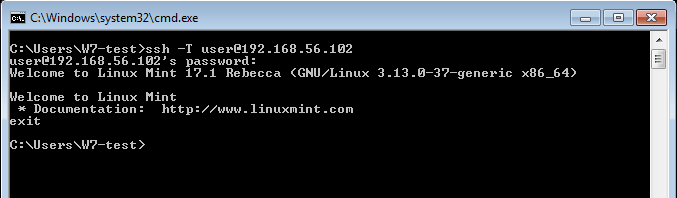
cannot spawn ssh: No such file or directoryLet’s test a SSH connection through windows command line
ssh –T user@192.168.56.102Where “user” is the server’s username and “192.168.56.102” is the IP address. Change this values to match your needs. If all goes well you should see:
Now let’s make a connection with
plink.exeand with the RSA key loaded inpageant.exe. The objective is to connect with SSH without the need to enter the key’s passphrase.Start by executing Pageant (located in the same folder as PuTTY) and load your private key:
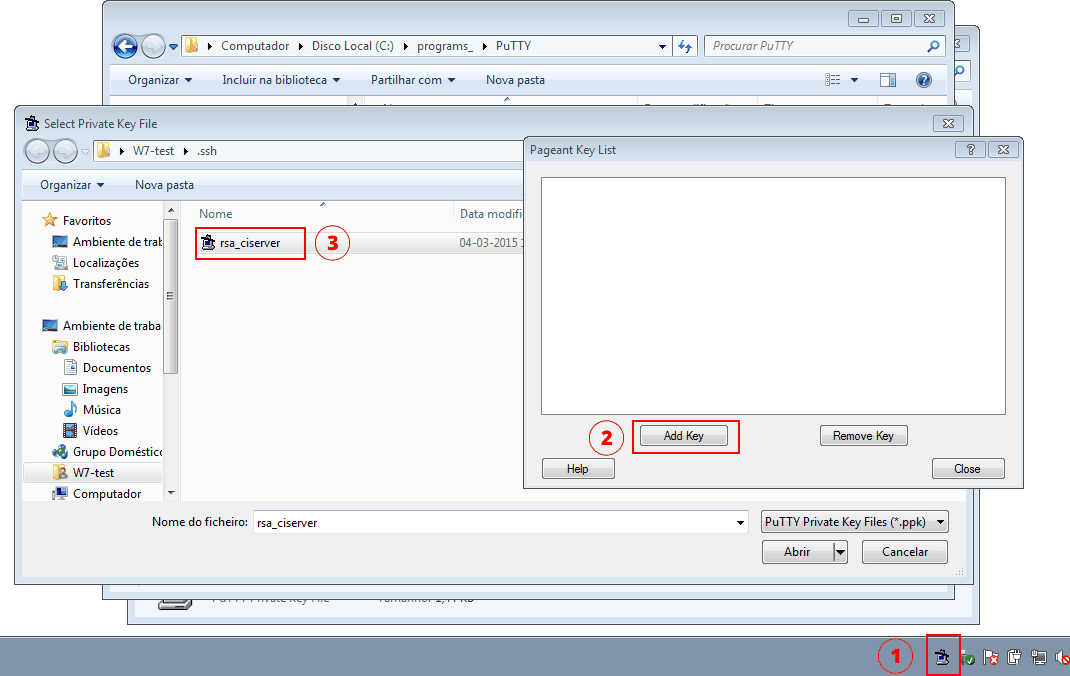
You should enter the passphrase and the key should be loaded in Pageant.
Test the connection with plink:
plink user@192.168.56.102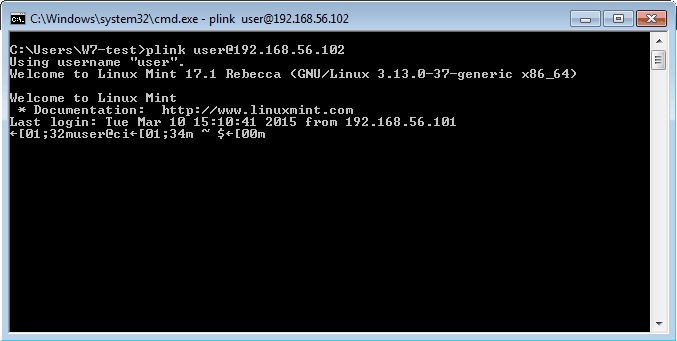
So, we made sure everything is working. You can create a new SSH connection without the username / password pair and without the need to enter the passphrase, as long as you have your key loaded in Pageant.
4. Create a PHP project and push it to the server
Now we’ll create our project to be pushed to the Git repository created in the first section. This PHP project will be used in the rest of the articles for this series and we’ll use Laravel 5.0.
Let’s start by creating our project with the help of Composer, which is a dependency manager for PHP. I’m assuming you already have Composer installed as part of your Windows development set up.
composer create-project laravel/laravel testproject –prefer-distThat command will create a new folder, called testproject, in your current location. The contents of testproject are the contents of Laravel framework.
Now initialize the Git repository inside our project’s folder (which is c:\webapps\testproject on my machine). After that, we’ll do our first commit with the message “First commit”.
cd C:\webapps\testproject>
git init
git add .
git commit -am "First commit"
At this time our project is in our local repository.
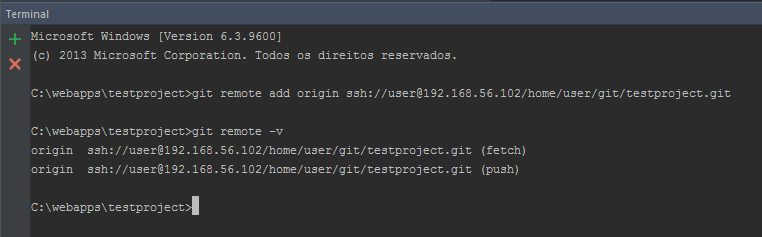
Before we’re able to push the project to our Git repository, we need to add the remote repository with the following command. Make sure you’re executing Pageant and your RSA key is loaded (as we did on the final steps of the previous section).
git remote add origin ssh://user@192.168.56.102/home/user/git/testproject.gitWhere:
- user is the server’s username
- 192.168.56.102 is the server’s IP address
- /home/user/git/testproject.git/ is the path to the Git repository on the server. This is the location where we created the repository on section 1.
Now, finally, let’s push our project to the server’s Git repository. To do so, run the following command:
git push origin masterYou should see a message like
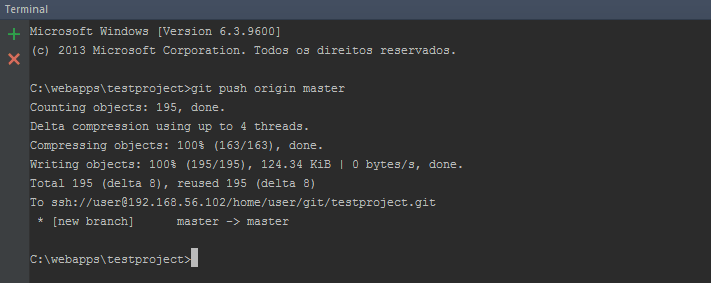
So, after the installation of Git and SSH on the server, the generated RSA keys, the installation of Git on our Windows development machine and the initialization of Git repositories, we’re able to push our changes to the remote server. An we can push our changes without the need of username / password or entering our key’s passphrase.
In the next article we’ll learn how to install Redmine and how to integrate it with Git, so we can check the changes directly on Redmine. We’ll also tell you how to close Redmine issues through Git commits.
This article is a part of the series How to set up a Continuous Integration Server for PHP projects
- Tools for a Continuous Integration (CI) server for PHP projects
- Install SSH and Git on Linux and configure a Windows development machine - You are here
- Install Redmine and integrate it with Git
- Install and configure TeamCity 9
- Install and configure TeamCity Agent on Linux Mint
- Install SonarQube and SonarQube Runner on Linux Mint
- Analyse a Laravel 5 (PHP) project with SonarQube
- Integrate SonarQube with TeamCity and Redmine